Showing posts with label wedding plannings tips. Show all posts

Monday, March 12, 2012

Bridal Registry Essentials

Have you and your fiance registered for wedding gifts yet?  Completing your bridal registries is a highly recommended activity on your wedding planning checklist.  We suggest registering so it takes some of the guess work off your guests when they graciously buy your wedding gifts.  Your guests want to buy you something you want and need in the colors that work for you and your new home together; going off a list that you made is very welcomed etiquette for your family and friends. 
The Registry Essentials - what every bridal registry should have included (unless of course you already have these things!):

♥ Cooking: KitchenAid Mixer (as my own sister-in-law has informed me, a wedding is the perfect time to get one!), Knife Set, Cooking Ware, Bake Ware and Bowls, Dutch Oven, Cooking Utensils, Kitchen Appliances you don't own or want to update (blender, beater, chopper, coffee maker, toaster, toaster oven, panini press, crock pot, etc.)

♥ Dining: Casual and China Dinnerware, Stemware, Glassware, Silverware, Table Linens, Salt/Pepper Shakers, Serving Bowls/Platters 
♥ Nesting: Bedding, Towels, Bathroom Accessories (shower curtain, soap dispenser, rugs, etc.)
♥ Home Decor: Frames, Vases, Lamps and Lighting, Mirrors, Candleholders, Centerpiece Bowls, etc.
♥ Playtime: Camping Equipment, Grilling Items, Picnic Baskets, Yard Games, Board Games, Luggage, etc.

You can register at a common retail store like Macy's, Target, or Bed, Bath, and Beyond either in store or online.  You also have the option to register on a website that pulls from different stores like http://www.myregistry.com/. 

For more information on registries contact us at http://www.vintageandlace.com/!

Have a great day!
Heather

*All images are from Macys.com and compiled to make collages.

Wednesday, February 15, 2012

Wedding Desserts, Yum!

Traditionally a bride and groom went cake tasting and selected a wedding cake.  The wedding cake was primarily designed to be several layers of rich flavors with intricate white or ivory icing.  Beautiful and classic.  
photo from weddingmagazine.co.uk
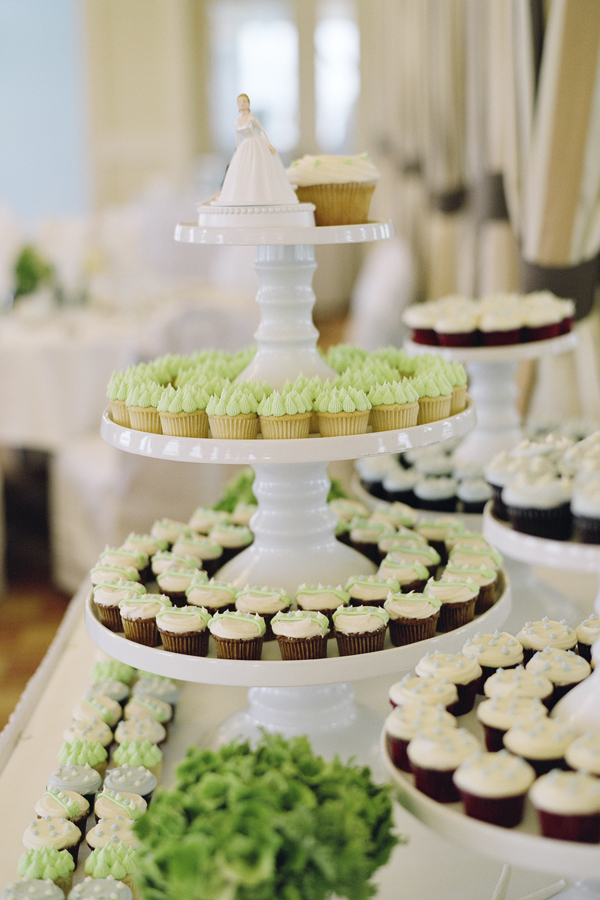
Today, the possibilities cross many categories of desserts.  One of the most common alternatives to cakes are cupcakes!  You can layer them on stands for the traditional outline of a tiered cake or place them on beautiful platters and stands on your dessert table.  This yummy sweet minimizes the necessity for a cake cutter and makes delivery a simple process. 
photo from wedding-cupcakes.org
Another great alternative is pie!  You can offer a variety of your favorite pies for your guests to share.  I love this idea for a country wedding!
photo from tradewindtiaras.blogspot.com
Other options include the new trend of a cookie table, donuts for the donut lovers, pastries for the Parisan inspires, or homemade desserts for the DIY inspired!

photo from weddingwindow.com
Like all aspects of your wedding day, consider your style and vision when considering your desserts.  Have fun planning and enjoy the tastings!
Happy Wishes,
Heather   

Monday, October 31, 2011

Seven Scary Things That Could Happen on Your Wedding Day

www.musiccityevents.wordpress.com
7 Scary Things That Could Happen on Your Wedding Day: 


#1. Your officiant shows up an hour late because they couldn't find the venue!


#2. The caterer runs out of buffet food before all your tables have been served! 


#3. Your drunk friend spills red wine on your white dress right before crashing into your wedding cake! 


#4. The airline loses your luggage with your dress inside on the way to your wedding destination!


#5. It starts to pour right before you walk down the aisle and you don't have a back-up ceremony site! 


#6. You requested a pale pink and ivory bouquet but the florist shows up with a red, white and blue one! 


#7. You forgot to get your marriage license so the whole thing isn't legal! 


These are just a few of the scary things that can happen at your wedding without proper planning and appropriate checklists! But don't worry; all of these can be avoided or corrected if you hire a competent wedding planner. 


A wedding planner will make sure the caterer has calculated the right amount of food for your wedding day and has a back up supply just in case your guests consume more than expected. They will also make sure that tables that might eat lighter, such as those with your grandparents, go first instead of your fiancés' college buddies who might overfill their plates before others reach the line.


Additionally, a competent wedding planner will always advise you to carry your wedding dress on the plane with you no matter how inconvenient it might be because you just can't run the risk of losing it in the airline shuffle. 


When you have to travel with your dress, helps to
choose a gown that is fabulous without being too bulky!
Photo:www.bhldn.com
 A good wedding planner will also keep an eye out for any guests that seem overly intoxicated or unruly and are starting to get out of hand. They can tactfully but assertively steer the guest back to their table and offer them a glass of water. 


They will also always advise you to have a back up rain location. Even if it hardly ever rains in your area, it is always good to have a "Plan B" and with weddings, it is always better to be safe rather than sorry! 


 Finally, a wedding planner will double check all the details with your vendors, such as the florist, to ensure that the details and colors are correct. When possible, they may even visit the floral shop the day before the wedding to see that the flowers are just what you asked for. 
The pale pink and ivory bouquet you wanted!
Photo: www.weddingwire.com
Protect yourself from these and other scary things that could happen on your wedding day by hiring a competent wedding planner! You will be happy you did! 


Aloha, 
Rachael 


www.vintageandlace.com

Sunday, June 12, 2011

Vintage Wedding Signs: DIY Project

thingsrbetterwithaparrot.typepad.com/homegrown-wedding


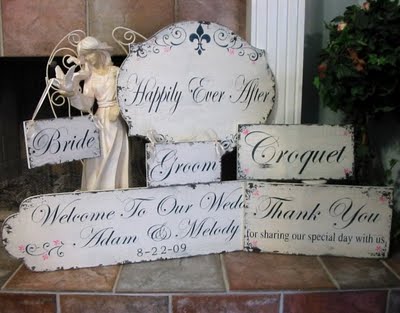
Handmade signs are a simple and functional addition to your wedding decor. Not only do they add a certain fun, vintage ambience to your wedding, they also serve the important purpose of making sure your guests know where to go. 


We recently made a simple version of our own so we could show you just how easy this really is! 


The ideal material to use is recycled or aged wood. However, we didn't have any lying around so we opted to buy some inexpensive wooden boards from our local craft store. 


Tip: For the most inexpensive options, check the section of your craft store where model airplane/car building supplies are located. These thinner, light weight pieces of craft wood are perfect for gluing to a post with basic wood glue. You can also glue a nice ribbon to the back of the craft wood as a hanger that should hold just fine. However, if you want to attach a metal hanger of some type that requires puncturing the wood, we suggest going with a thicker option found at a hardware store. 


Because this wood is brand new and doesn't have that vintage charm we love, you will also need some wood stain or brown paint to create a quick "aged" look. Tip: Check the local hardware store for returned/sample/mistake paint that is often good quality and extremely discounted. That is where we found our bucket of brown paint for just a few bucks!
In addition to your wood, you will also need a small amount of white paint (or any other color you choose) for the writing, a medium size brush, a wide bristle brush, and some newspaper to keep your space clean. That's it! 


To achieve the vintage look use the wide bristle brush to make long sporadic strokes across the board with your dark brown paint. Be sure to leave some of the natural wood exposed so the desired affect is achieved. 


While you wait for the brown paint to completely dry, begin to conceptualize what you want your signs to say and what type of font you'd like to use. First think about the functionality of the signs: Will your guests be relying on these signs to point them in the right direction? What is the best way to communicate what you want them to know? 


It is also very important to think about how big the font needs to be for your signs to be clearly visible. For example, if your guests will need to see your sign from a main road where the speed limit is a bit higher, then make sure your font is bold and large enough. However, if your guests will be viewing the sign in a drive way where they will be going more slowly then you may not need to use such a large font. By the same token, if your sign will be placed on a walking path, then you can use an even smaller font and possibly write more. Just remember that keeping things short and sweet is often the best bet. 


If you want your signs to look more rustic choose a print font that is imperfect.
 If you want a more formal appeal, then choose a cursive font. 
weddingbee.com

Keep in mind that the point is for these signs to look handmade, so they don't have to be perfect. Don't sweat it if you can't make them look as flawless as those pictured above! You can save the calligraphy for those invitations! 


Now for the fun part! Get creative and come up with interesting ways to tell your guests what to expect. We chose to mark the reception driveway with a sign that says: "Dinner and Dancing". We have also seen "Party Here". We really like "Happily Ever After Starts Here", "Here comes the bride", or "From this day forward" for ceremony sites. We also like "Slow: Cocktails Ahead" for showing your guests where to find drinks and food. 


You can also simply put your names with a heart or plus sign and the date. Or, you can put "Mr. and Mrs, ____. established (your wedding date)". This can be a great keepsake to hang in your home as a reminder of your special day. 
Now that you have your ideas and your paint is completely dry, you can start to add the words. If you are a little nervous about jumping right in, you can use a pencil to lightly write your words before using the paint to trace over the lines. This is a good idea if you are concerned about the spacing of your letters and words.


For our sign, we chose an off white paint to give it a little bit more of a vintage touch. We chose a thick, large font so the sign would be clearly visible from the driveway. We also accented the font by making the ends of the letters a little wider so they would feel a bit more fun! 


That's basically it! Simple, fun, and inexpensive -our favorite kind of project! Of course, you can get more creative than this and add ribbons, more colors, etc. depending on the look you are going for, the amount of time you have and your creativity comfort level. 


We hoped you enjoyed this introduction to DIY wedding signs. This is a project that even the craft-challenged can undertake because part of the charm is in the imperfections! 


Thanks for visiting our blog, please also check out our website at www.vintageandlace.com and like our Facebook Page: Vintage and Lace Wedding Specialists for other tips, tricks and projects to make your wedding day one-of-a-kind! 


And, as always, feel free to contact us with any questions or comments, or to learn more about our Wedding Planning Services!  


Rachael@vintageandlace.com


Note: If your signs are going to be outdoors for an extended period of time or you want them to last for years to come, we suggest spraying them with a protective gloss or coating.